
DIY garage doors are becoming a major trend across Australia as we move into 2026. Homeowners and renovators are increasingly looking for ways to save on installation costs while enjoying the personal satisfaction of hands-on upgrades.
Rising service fees, limited customisation, and long wait times for professional installers often frustrate those wanting a quick and stylish solution. This guide was created for anyone ready to take control of their project and achieve a safe, attractive, and fully functional garage door on their own terms.
Inside, you will find a comprehensive, step-by-step approach to diy garage doors. We cover everything from understanding door types and materials, planning and preparation, installation, safety essentials, maintenance, and troubleshooting tips. Follow along to transform your garage with confidence.
Understanding Garage Door Types & Materials
Selecting the right type and material is crucial for any diy garage doors project. Your choice affects installation, appearance, longevity, and daily convenience. Let’s explore the main options available to Australian homeowners in 2026.
Overview of Popular Garage Door Types
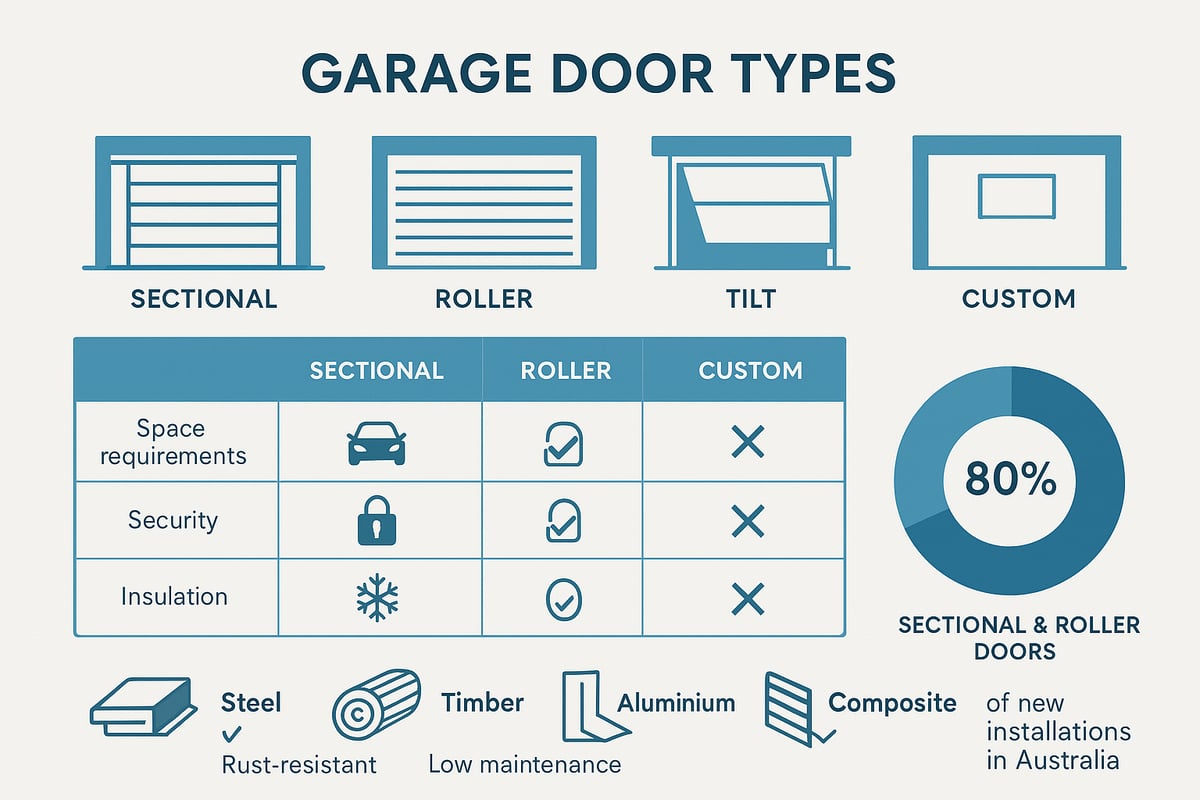
Australia’s most popular garage door types for diy garage doors projects are sectional, roller, tilt, and custom designs. Each has distinct features that suit different needs.
| Type | Space Needed | Security | Insulation | Best For |
|---|---|---|---|---|
| Sectional | Moderate | High | Good | Modern homes, wide bays |
| Roller | Minimal | Good | Moderate | Compact driveways |
| Tilt | Large | Moderate | Basic | Older homes, low cost |
| Custom | Varies | Custom | Custom | Unique designs |
Sectional doors remain the top choice for most Australian homes due to their space efficiency and reliable insulation. According to industry estimates, sectional and roller doors account for over 80 percent of new installations. For a detailed breakdown, see this Sectional garage doors overview.
Material Choices and Their Benefits
Material selection is a key factor in diy garage doors performance and upkeep. Homeowners can choose from steel (including Colorbond), timber, aluminium, or composite panels.
Steel, such as Colorbond, offers exceptional durability, rust resistance, and minimal maintenance, making it ideal for coastal regions. Timber provides a classic aesthetic but requires regular sealing or painting. Aluminium is lightweight and resists corrosion, while composite doors blend materials for added strength and design flexibility.
A popular choice for diy garage doors in Australia is Colorbond steel, especially for properties exposed to salt air. Steel doors generally deliver the best value for security, price, and ongoing care.
Manual vs. Automated Garage Doors
When planning diy garage doors, decide whether you prefer manual operation or an automated opener. Manual doors are cost-effective and simpler to install, making them appealing for straightforward projects.
Automated garage doors, however, offer unmatched convenience and can be retrofitted to most sectional or roller doors with compatible kits. While motors and remotes add to the upfront cost, over 70 percent of new garage doors sold in 2025 included automation. Retrofitting automation to existing sectional doors is a common upgrade for DIYers seeking enhanced functionality.
Choosing the Right Door for Your Needs
With so many options, how do you select the best diy garage doors for your home? Start by considering your budget, garage size, local climate, and security requirements.
For tight driveways, roller doors are an excellent fit. Sectional doors suit wider openings and modern facades. The right choice will complement your property’s style and boost its value. If your garage opening is non-standard, speak with suppliers about custom solutions to ensure a seamless fit and reliable operation.
Planning & Preparation: Setting Up for DIY Success
Getting started with diy garage doors requires accurate planning and careful preparation. By following these essential steps, you’ll set yourself up for a smooth installation and long-lasting results. Let’s break down the process so you can avoid common pitfalls and make informed decisions for your project.
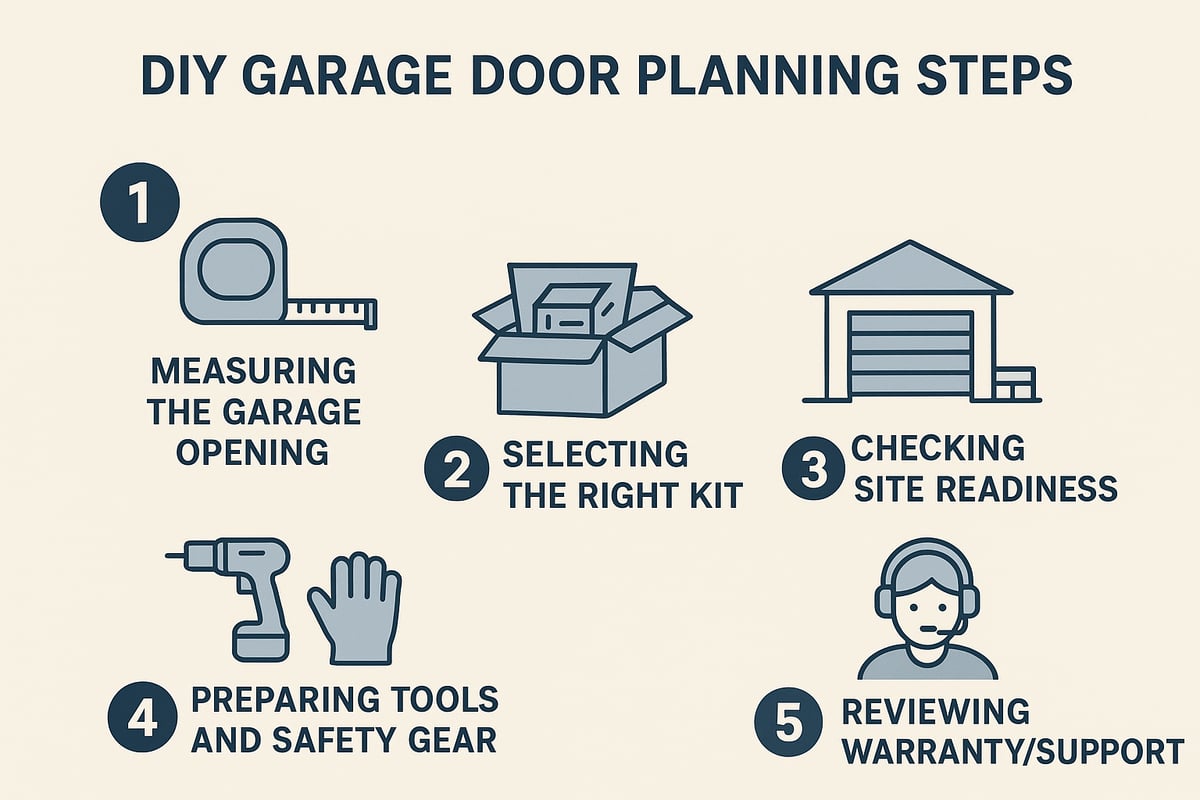
Measuring Your Garage Opening Accurately
Precise measurements are the foundation of every successful diy garage doors project. Begin by measuring the width and height of the opening at multiple points, as garages can be uneven. Next, check the side room on each side, the headroom above the opening, and the backroom inside the garage.
A common mistake is overlooking the space needed for tracks or openers, which can result in costly delays. Many leading suppliers offer diagram-based guides to help you measure correctly. Remember, incorrect measurements are the number one cause of failed diy garage doors installs, according to supplier feedback.
Selecting and Ordering Your Garage Door Kit
Choosing the right kit for your diy garage doors is crucial. Standard kits usually include door panels, tracks, springs, and essential accessories. However, items like motors, locksets, and installation are often not included, so double-check what’s listed before you buy.
For example, Gliderol kits provide all major hardware except automation, which must be purchased separately. Always confirm the full parts list with the supplier to avoid surprises or delays. A thorough inventory check ensures your diy garage doors project gets off to a strong start.
Ensuring Site Readiness & Clearance
Before installing diy garage doors, assess your garage for the required clearances. Most sectional doors need at least 100mm of side clearance, as noted by CMC Automatic Doors. Check for obstructions like pipes, wiring, or uneven floors that could interfere with the door or tracks.
If you have limited space above your opening, consider a Low headroom kit for sectional doors to make installation possible. Address any structural issues ahead of time to avoid complications during your diy garage doors upgrade.
Tools & Safety Equipment Checklist
Having the right tools and safety equipment makes diy garage doors installation safer and more efficient. Essential tools include a drill, level, socket set, and winding bars (especially for torsion springs). For personal protection, wear gloves, safety glasses, and steel-cap boots at all times.
Using proper winding bars for spring tensioning is critical. Never substitute with makeshift tools, as this can lead to serious injury. The right gear not only speeds up the process, it also helps prevent common mistakes during your diy garage doors project.
Understanding Warranties & Support
Diy garage doors typically come with warranty periods—often 12 months for finishes like Colorbond. Review the supplier’s warranty details before committing to a kit. Access to clear installation manuals and responsive supplier support is invaluable for DIYers.
Some suppliers offer phone or email support to assist with installation questions. Keeping all documentation handy will make future maintenance or warranty claims much easier.
Step-by-Step DIY Garage Door Installation Guide
Upgrading your garage with diy garage doors is a practical way to boost home value and convenience. This section will walk you through every stage, from unpacking your kit to final safety checks. Whether you are a first-time DIYer or an experienced renovator, you will find clear, actionable steps to achieve a professional result. For even more detail, you can refer to this DIY Garage Door Installation Guide alongside the instructions below.

Unpacking, Inspecting, and Preparing Components
Begin your diy garage doors project by carefully unpacking the kit. Lay out all components in a spacious, clean area. Check the contents against the supplied parts list. Look for any dents, scratches, or missing hardware.
- Use a checklist to compare each item.
- Inspect panels for straightness and finish quality.
- Photograph all parts before assembly to document condition.
If you notice any damage or missing items, contact your supplier immediately. Never start installation with incomplete or faulty parts, as this can lead to delays or safety hazards. Keeping your workspace organised will make the rest of your diy garage doors installation smoother and more efficient.
Frame and Track Installation
Accurate track installation is critical for smooth operation of diy garage doors. Begin by marking out the position for vertical and horizontal tracks according to your door’s manual. Use a laser level or spirit level to ensure everything is perfectly square and plumb.
Steps:
- Secure the vertical tracks to the wall, checking for level at each stage.
- Attach horizontal tracks, ensuring they run parallel to the ceiling.
- Double-check all fasteners and brackets for tightness.
Misaligned tracks often cause doors to bind or jam. If your garage walls or ceiling are uneven, use packers or shims to create a level surface. This stage sets the foundation for a reliable diy garage doors installation, so take your time and verify all measurements before proceeding.
Installing Door Panels/Sections
Now, assemble your door panels. For sectional diy garage doors, attach hinges, rollers, and brackets to each panel first. Always follow the manufacturer’s sequence for stacking panels—bottom to top.
- Use two people for lifting larger panels to avoid strain.
- Secure each panel in place before adding the next.
- Make sure rollers are correctly seated in the tracks.
Proper alignment is key. Panels should slot seamlessly together, with no gaps or misalignments. Double-check that all fasteners are tightened, as loose hinges can cause excessive noise or premature wear in diy garage doors. Take care with decorative finishes to avoid scratches during installation.
Spring and Counterbalance System Setup
Handling springs is the most technical part of diy garage doors installation. Identify your spring type: torsion, extension, or specialty. Always use the correct tools, such as winding bars for torsion springs, and wear safety gear.
Step-by-step:
- Secure the spring assembly firmly to the wall or frame.
- Wind the springs to the specified tension, following your manual closely.
- Use two people for this task to maintain control and safety.
Caution: Spring-related injuries are the most common hazard with diy garage doors. Never use improvised tools or attempt spring work alone. If unsure, consult a professional or refer to detailed supplier videos. Double-check all connections before proceeding to avoid accidents or door malfunction.
Mounting the Door and Testing Manual Operation
With panels and springs in place, mount the door fully onto the tracks. Ensure the door moves freely by lifting it manually. A properly balanced diy garage doors installation will allow the door to stay halfway open without drifting.
Checkpoints:
- Test for smooth, even movement along the tracks.
- Adjust spring tension if the door feels too heavy or light.
- Confirm that all brackets and fasteners are secure.
Manual testing is essential before adding automation. It ensures that your diy garage doors are functioning safely and efficiently in their basic form, reducing the risk of future issues.
Adding Automation (If Applicable)
Many modern diy garage doors are compatible with automation kits. Choose a motor and drive system suited to your door type and size. Begin by mounting the opener to the ceiling, then install the drive rail and connect it to the door.
Step-by-step:
- Secure the opener bracket and align the drive rail.
- Attach the opener arm to the top panel.
- Connect electrical wiring, following Australian standards.
Test the remote and safety reversal systems thoroughly. Automation adds daily convenience to diy garage doors but must be correctly installed for safety. If you encounter complex wiring, consult a licensed electrician. Refer to your opener’s manual for troubleshooting and adjustments.
Final Adjustments and Safety Checks
Finalise your diy garage doors installation by reviewing all fasteners, brackets, and safety cables. Adjust spring tension for optimal door balance. Test emergency release and manual override features.
Checklist:
- Simulate a power outage to ensure manual operation works.
- Inspect all moving parts for smooth function.
- Confirm safety labels and warnings are visible.
Routine testing is vital for ongoing safety. Regularly check these systems as part of your diy garage doors maintenance to avoid surprises or failures down the track.
Clean-Up and Disposal of Packaging
Once installation is complete, clear the site thoroughly. Dispose of cardboard, plastic, and old door panels responsibly. Many steel and timber components can be recycled at local facilities.
Tips:
- Retain installation manuals and spare hardware for future reference.
- Store leftover paint or touch-up materials in a labelled container.
A tidy, organised workspace reflects the professionalism of your diy garage doors project and ensures safety for your family and visitors.
Safety Essentials for DIY Garage Door Projects
Safety is the cornerstone of any successful diy garage doors project. Whether you are a first-timer or an experienced renovator, understanding the main hazards and following best practices is essential for a smooth, injury-free installation. This section breaks down the key risks, safe handling tips, electrical safety, emergency responses, and when to call in the experts.
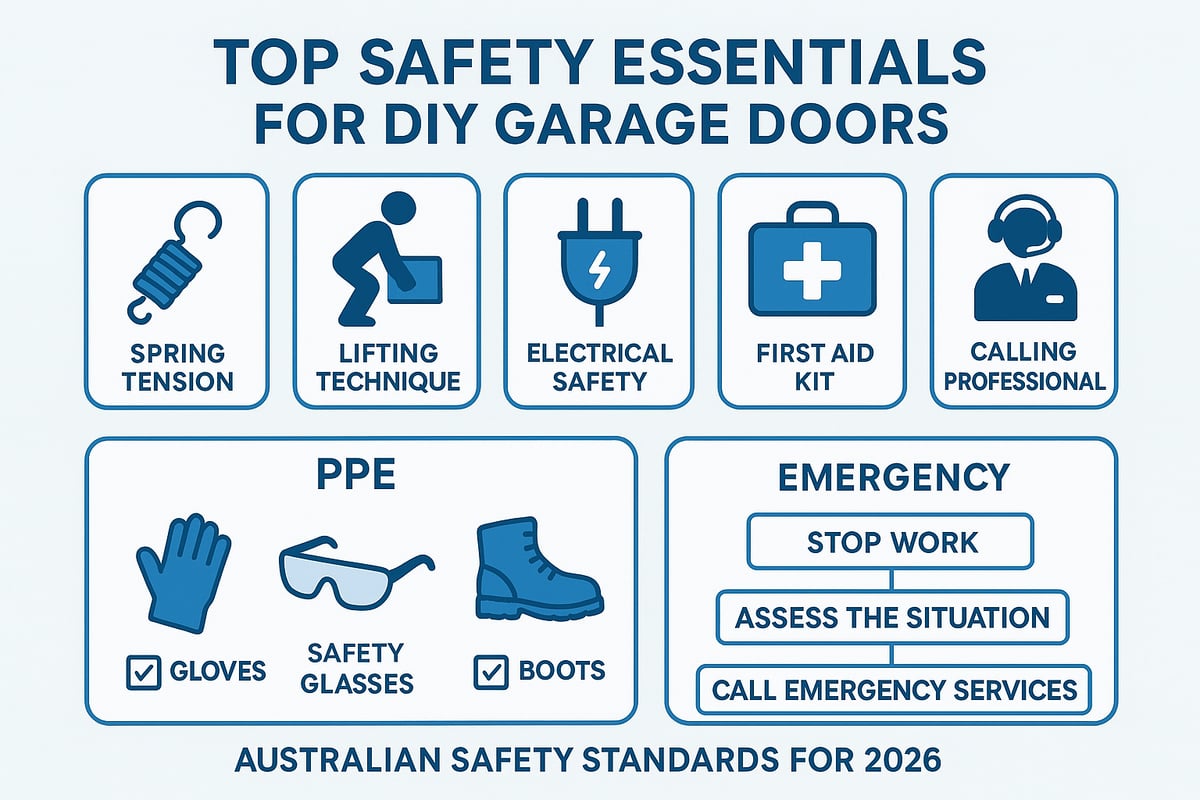
Identifying and Managing Key Risks
Handling diy garage doors involves risks that should never be underestimated. The main hazards include the tension in springs, the weight of panels, and potential falls during installation. According to industry data, spring-related injuries are the most common, but most incidents are preventable with proper technique.
Familiarise yourself with updated safety standards and always use recommended equipment. For a detailed overview of compliance requirements and injury prevention, consult the Garage Door Safety Standards Australia 2026 Guide. Being aware of these risks is the first step to ensuring a safe diy garage doors upgrade for your home.
Safe Handling of Springs and Heavy Components
Springs in diy garage doors are under extreme tension and require careful handling. Always use the correct winding bars for adjusting torsion springs, never makeshift tools. Team lifting is essential for large panels, as even lighter doors can cause strain or injury if handled alone.
Before starting, double-check that your workspace is clear and that you have enough help on hand. Never rush the installation—take your time to follow each safety step. This approach greatly reduces the chance of accidents during your diy garage doors project.
Electrical Safety When Adding Automation
Upgrading diy garage doors with automation introduces electrical risks. Always isolate power at the switchboard before starting any wiring work. Australian regulations require that all permanent electrical connections be performed by a licensed electrician.
Never attempt to bypass safety switches or install openers without checking compatibility and compliance. If you are unsure about any step, do not hesitate to seek professional assistance. This ensures your diy garage doors automation is both safe and durable.
Emergency Procedures and First Aid
Despite the best precautions, accidents can happen during diy garage doors installation. Keep a stocked first aid kit readily accessible and ensure everyone on site knows its location. If a spring snaps or a pinch injury occurs, stop work immediately and assess the situation.
Apply first aid promptly and seek medical attention for serious injuries. Having emergency contact numbers on hand is a simple but crucial precaution. Quick, calm responses can make all the difference in managing incidents on your diy garage doors project.
When to Call a Professional
Some diy garage doors situations are best left to the experts. If you encounter complex spring systems, high-lift doors, or structural issues, do not proceed alone. Commercial installations or any scenario involving major modifications should always be handled by qualified professionals.
Recognising your limits is a key part of home safety. By knowing when to seek help, you protect both yourself and your property during your diy garage doors journey.
Maintenance, Care & Troubleshooting Tips
Regular maintenance is crucial for the performance and longevity of diy garage doors. A proactive approach helps prevent costly repairs and ensures your door remains safe and reliable throughout the year. Below, you will find practical tips to keep your garage door in top condition, tailored for Australian conditions and the needs of DIY enthusiasts.
Routine Maintenance Checklist
Keeping diy garage doors in peak condition starts with a simple monthly routine. Lubricate all moving parts, including rollers, hinges, and tracks, using a silicone-based spray. Inspect cables, springs, and fasteners for wear or damage. Tighten any loose hardware and clear debris from tracks.
A regular maintenance schedule can extend your door’s lifespan by up to 30 percent. For guidance on maintaining security and servicing needs, refer to this Garage Door Security and Servicing Guide. Small checks now can prevent big problems later.
Seasonal Care for Australian Conditions
Australia’s climate poses unique challenges for diy garage doors. In coastal areas, salt air accelerates corrosion, so rinse and wipe down steel doors regularly, especially after storms. For bushfire-prone zones, check seals and insulation, and consider Fire Ratings and Garage Door Insulation to enhance protection.
Dusty or arid environments require regular cleaning of tracks and panels. Repaint Colorbond surfaces as needed to prevent fading or rust. Adapting your care routine to local conditions will keep your door looking and operating its best.
Common DIY Problems & Solutions
Even well-maintained diy garage doors can experience issues. If your door does not open or close smoothly, check for track misalignment or improper spring tension. Noisy operation is often caused by a lack of lubrication or loose hardware.
If your remote control fails, check the battery first, then look for potential signal interference. Most problems have straightforward fixes, but always follow safety procedures. Routine troubleshooting helps you address issues before they become serious.
How to Measure and Replace Springs or Cables
Spring and cable wear is inevitable for diy garage doors, so knowing how to measure and replace them is essential. Always disconnect the door from the opener and secure it in the open position. Measure the length, diameter, and type of spring or cable before ordering replacements.
Wear gloves and eye protection, and follow supplier video guides for safe removal and installation. Never attempt to replace high-tension springs alone – seek professional support if unsure. Accurate measurement and safety precautions are key to a successful repair.
Resources for Further Help
When tackling complex repairs or unique issues with diy garage doors, turn to trusted resources. Many suppliers offer online video tutorials and downloadable manuals for step-by-step guidance.
Supplier helplines and support forums can provide expert advice tailored to your specific door model. Keeping these resources handy ensures you are never alone in your DIY journey.
Frequently Asked Questions About DIY Garage Doors
Thinking about tackling diy garage doors? Here are the most common questions homeowners and renovators ask before starting their garage upgrade project. Dive into cost, timelines, warranties, and legal essentials so you can plan your diy garage doors installation with confidence.
Cost Savings and Budgeting for DIY
One of the main reasons Australians choose diy garage doors is to reduce overall project costs. By installing your own door, you can save up to 40 percent compared to hiring a professional installer. For example, a standard sectional garage door kit starts at around $1,200, while professional installation can add $500 or more to the total bill.
Here is a simple table comparing typical costs:
| Item | DIY Cost | Pro Install Cost |
|---|---|---|
| Sectional Door Kit | $1,200 | $1,200 |
| Installation Labour | $0 | $500+ |
| Total | $1,200 | $1,700+ |
While diy garage doors can deliver real savings, be sure to budget for tools, optional automation, and any delivery fees. Always check if your chosen kit includes all hardware or if you need to purchase extras.
Lead Times, Delivery, and Pickup Options
When ordering diy garage doors, expect lead times of two to four weeks for most standard kits. Custom finishes or sizes, such as Colorbond doors, may take longer. Many suppliers offer both delivery and factory pickup options, giving you flexibility based on your location.
For example, Gliderol offers convenient factory pickup for NSW customers, which can help you avoid delivery delays. If you are considering roller doors, browse the Roller doors for DIY projects collection to compare lead times and styles suitable for diy garage doors.
Always confirm delivery charges and ensure you have enough space to store your door safely until installation day.
Warranty, Returns, and After-Sales Support
Most diy garage doors come with a 12-month manufacturer warranty covering defects in materials and finishes, such as those on Gliderol and Colorbond products. Read the warranty terms carefully, as some conditions may apply to self-installed doors.
Suppliers often provide after-sales support specifically for diy garage doors, including phone or email assistance if you run into issues during installation. Returns policies can vary, so check if you can return unopened kits or request replacement parts if something arrives damaged.
Keep your proof of purchase and installation manual handy, as you may need these for any warranty claims.
Legal and Compliance Considerations
Before installing diy garage doors, check your local council’s building codes and approval requirements. In some Australian regions, certain door types or automation systems must be installed or certified by a licensed professional. This is especially important for larger or commercial doors.
For residential properties, most standard diy garage doors are compliant, but always verify before you begin. Failing to follow local regulations could affect your home insurance or create issues if you sell your property in the future.
Tip: Contact your local council or door supplier with your plans and garage measurements to make sure your diy garage doors project meets all legal requirements.
Now that you understand the different types of garage doors and have a clear step by step plan for your DIY upgrade, you are ready to make a confident choice that fits your home and lifestyle. Sectional garage doors continue to be the most popular solution for modern Australian homes, offering both style and security with minimal maintenance. If you are looking to enhance your property’s value and daily convenience, it is worth exploring the range of sectional options available. Take the next step towards your own successful installation and Buy a sectional garage door.